 Skip to content


Pulsed TIG Welding — Weld Thin Like a Pro
Pulsed TIG welding creates deeper penetration while reducing the heat input into the metal. Heat management is the primary reason to use pulsed TIG, but there are numerous benefits to this TIG welder function.

Photo by @escorza_engineerings
Using pulse, you can create flawless, smooth, deeply penetrating welds, even on a thin gauge material without burn-through.
In this article, we’ll discuss what pulsed TIG is, how it works, how to set it up, its advantages, disadvantages, and how to apply it to different metals.
What is Pulsed TIG?
To put it bluntly, pulsed TIG is an advanced heat input control mechanism. It’s something like a TIG foot pedal control, but on steroids.

Video by @niallmenzies
The foot control lets you taper the TIG welder amperage output. Press the pedal, and the amperage output is higher; back off the pedal, and the amperage output is lower. Of course, you can also use the pulsed TIG with the foot pedal. But, pulsed TIG creates a similar effect as the foot pedal.

Photo by @tig_welder86
Pulsed TIG mode lets you set the maximum amperage you wish the welder to output, the minimum amperage, and the frequency of how many times you want the output to alternate between the two.

Photo by @tig_welder86
For example, 10Hz with 100A on the high end and 20A on the low end creates ten pulses per second (“PPS”) where each pulse is one switch between 100A and 20A. So, in one second, the current will switch ten times between 100A and 20A.
You could do the same with the TIG foot pedal if you were a robot. But, since we are made of flesh and blood, and our reflexes are nowhere near as fast, we should let the digital IGBT controllers perform such actions instead. Plus, you don’t have to experience severe foot fatigue.
How Pulsed TIG Works?
Pulsed TIG has several crucial variables to set:
- Peak amperage - The maximum amperage in one pulse
- Background amperage - The minimum amperage in one pulse
- Pulse width also referred to as “Pulse on time” - The percentage of the timeframe when the peak amperage is active
- Pulse frequency - Number of pulses per second

There are hundreds of configurations you can make with these four variables. Their values largely depend on the welded material, thickness, travel speed, desired bead shape, welding position, and your welding technique.
Standard AC/DC TIG welding outputs straight amperage you set on your welder. If you use a foot control, you need to select the maximum and minimum amperage values, similarly to pulsed TIG.

Photo by DIY Homestead Projects
So, when you choose the pulsed mode on your TIG welder, you need to define the highest and lowest amperage output. The pulse frequency determines how often the set values switch, and the pulse on time determines the duration of the peak amperage in one single pulse.

Photo by @foxdogwelding
This may sound confusing if you have never played with pulsed TIG before. So, let’s explain this through two examples — low and high pulse settings.
Low pulse frequency example:
- Peak amperage 150A
- Background amperage 50A
- Pulse width 30%
- Pulse frequency 1 Hz
The above settings output one pulse per second. This pulse will have a 30% time of 150A, and 70% of the time will output 50A. So, 0.3s 150A output and 0.7s 50A output.
High pulse frequency example:
- Peak amperage 250A
- Background amperage 70A
- Pulse on time 60%
- Pulse frequency 200 Hz

In this example, the TIG welder outputs 200 PPS. Each of these pulses will have a 60% time of 250A output and 40% time at 70A output. So, the duration of one pulse is 1s/200 or 0.005s. That tiny duration is additionally split between high and low amperage output — 60% of 0.005s outputs 250A and 40% of 0.005s outputs 70A.
You don’t need to bother with the math. We just wanted to demonstrate the underlying principles.

Advantages of Pulsed TIG Welding
It’s tough to name all the advantages of pulsed TIG because they largely depend on your work. But, pulsed TIG allows you to modify some of the most crucial welding variables like: depth of penetration, heat input, bead width, and weld appearance. So, it’s easy to find a use for pulsed TIG that improves productivity and cuts costs.

Photo by @l0rdwelder
So, let’s see how this works in action.
Improving Heat Input Control
Welding thin material is always challenging, no matter how good a welder you are. It’s almost impossible to weld sheet metal without any distortion. The best we can do is manage heat input and keep warping negligible.
It’s not just distortion you have to worry about with arc heat. Some metal like stainless steel can significantly lose their qualities if overheated. Stainless steel loses corrosion resistance if overheated because the carbon becomes concentrated in the heat affected zone. This makes heat input control that much more critical.

Pulsed TIG lets you drastically improve heat control. As a result, you’ll have fewer failed welds and less need for rework. Sometimes, this can save you a lot of money because metals like stainless steel, chromoly, or aluminum are not cheap, especially if they were machined before welding.
By reducing the duration of the peak pulse current and increasing the frequency of switching between the pulses, you can drastically reduce the heat input. This improves heat management and reduces the chance that the thin gauge will distort, discolorize, or lose corrosion resistance.

However, keep in mind that as you reduce the peak power duration, you automatically increase the low background amperage duration. This results in lower heat input and a less liquid puddle. Finding the right balance that works with your preferred travel speed is the key to using pulsed TIG to your advantage.
Additionally, at higher pulse frequency, the heat affected zone becomes narrower. This prevents unnecessary heat loss into the surrounding metal and lets you focus the arc where it matters — in the joint.
Improved Penetration and Travel Speed
The higher pulse frequency you use, the more constricted the arc becomes, and the deeper the weld penetration is achieved. So, if you need to weld thick metal, it’s helpful to crank up the frequency and keep the background amps somewhere around 50% of the peak amperage. But, the exact settings depend on the material, thickness, and other variables.
 However, regardless of the material, the high PPS creates a narrow, focused arc that penetrates deeply without wasting too much energy on the surrounding metal. So, you can use your machine’s power more effectively.
Apart from improved penetration, you can also weld faster with higher pulse settings. Anything above 100Hz (100 PPS) improves your welding speed. This is useful when welding thick or thin chromoly or other sensitive metals.
Out Of Position Welding
When making overhead TIG welds, it’s challenging to keep the weld puddle from falling on your welding helmet. The gravity works against you, and the more liquid the weld pool is, the easier it will fall.

Photo by weldingstars.com
So, lowering the duration of the peak amperage time can keep the weld chill enough to prevent an overly liquid puddle. You can also try increasing the pulse setting and lowering the peak amperage. This will achieve penetration thanks to the focused arc but shouldn’t liquify the puddle too much thanks to the lower amperage. This does depend on the metal, so it takes some tweaking until you dial in the right pulse settings.
Improved Weld Quality
The rapid action of switching between the low and high amperage output with high PPS creates a special ripple effect in the weld puddle. The more liquid the puddle, the stronger the ripple effect.

Photo by @glaisterwelds
This ripple effect, also referred to as weld agitation, sometimes benefits the joint. It helps prevent contaminants getting stuck underneath the weld by disrupting the surface tension, and it fills the joint more evenly. Many industrial welding processes use weld agitation, so having the ability to experience something similar with an inverter TIG welder is very helpful.
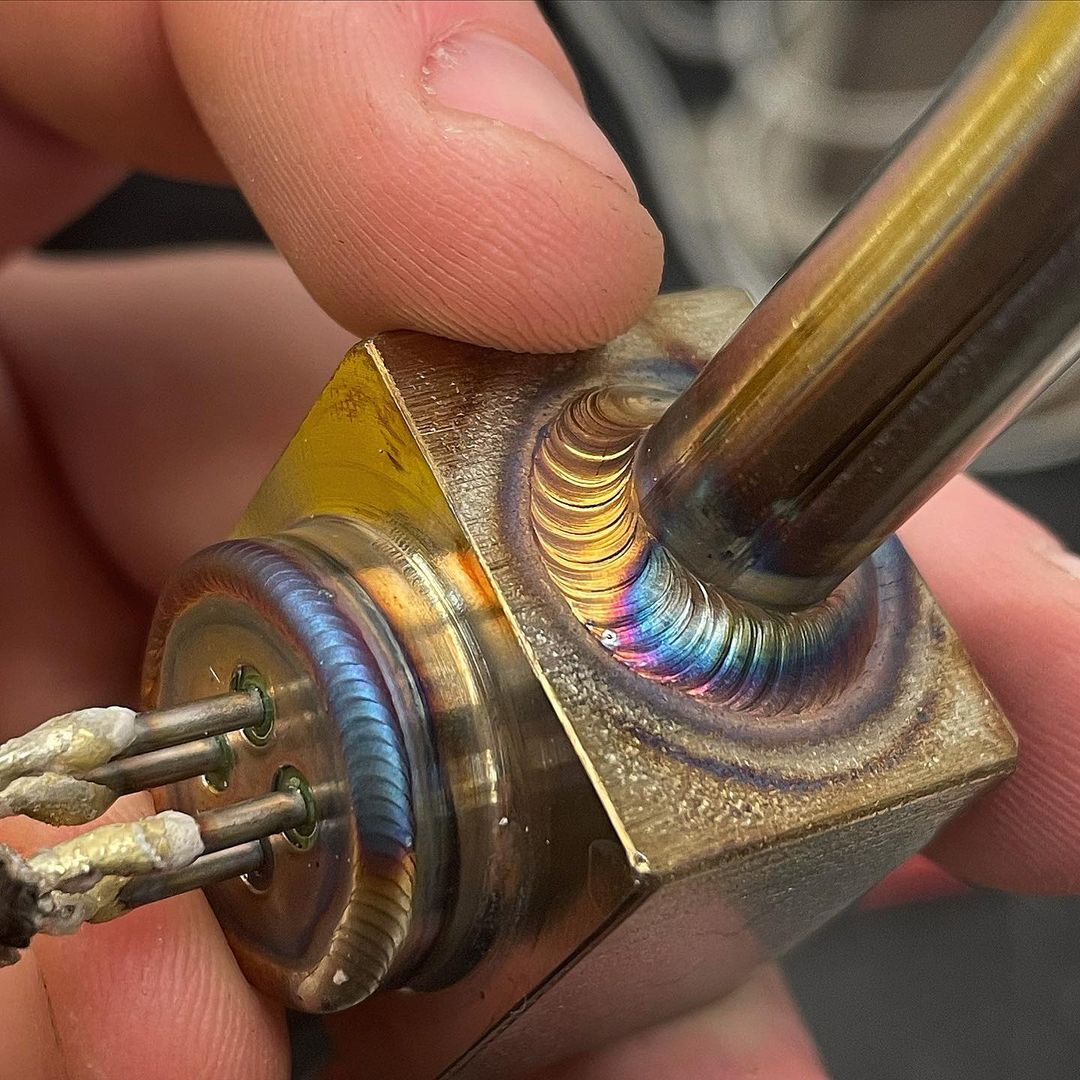
Enhanced Weld Looks
Pulsed TIG function is often responsible for those phenomenal TIG welds welders put up on their Instagram profiles. Of course, humility is a virtue, but hey, whoever makes a beautiful stack of dimes when welding stainless steel pipe, deserves every like they get on social media.

Photo by @lattinprecision
If you want to achieve a pronounced stacked dimes look, your best bet is to use a low pulse setting like 1-2Hz and time the filler metal addition to high current output. By using the low pulse frequency, you can dab the filler metal into the weld pool as the pulse switches the current.
Pulses make achieving a stacked dimes weld look much easier because you have a visual guide — as the amperage switches, the arc gets dimmer and then brighter again. It’s easy to catch the rhythm and dab the wire accordingly.

Photo by @lucky_13_welding
On the other hand, if you prefer a clean, smooth weld face, the high PPS is your jam. Anything above 30 PPS starts smoothing out the weld. But, it’s best to use a very high frequency, like 200 Hz and above. It’s impossible to see amperage switching with high frequency, but it smooths out the weld surface. This does depend on how you dab the filler wire, but if you drag it along as you weld and keep it melting, you’ll achieve a smooth weld face.

Photo by @lucky_13_welding
Additionally, it’s possible to make an additional pass without a filler metal over a previously laid weld. By using lower amperage and high pulse settings, you can melt just the face of the weld and smooth it out if that’s necessary. As a result, you’ll decrease your post-welding surface preparation time.
Welding Near Edges or Holes
It’s challenging to weld edges or make welds near holes, especially with thin sheet metal. The edges burn up, distort, lose original shape, and you must correct this with the filler metal in real time as you weld. Welding edges takes a skillful hand.

Photo by @lucky_13_welding
The pulsed TIG process makes this easier. By lowering the average heat input with pulsing, you’ll improve your chances of maintaining a proper edge.
The Main Disadvantage Of Pulsed TIG
The principal disadvantage of pulse TIG welding is the learning curve. If you are a beginner TIG welder, the chances are that you won’t get the hang of pulse welding right away. It takes some time to build up the necessary skills, especially feeding the wire into a pulsed arc.

Photo by @jtwonable
However, like most things in life — if it's worth doing, it won't come easy — and practicing pulse TIG is definitely worth your while. Plus, it’s not like pulse welding is reserved for pros only. Anyone can learn how to do it; it just takes some practice.
Our advice is first to learn how to perform regular TIG welding and develop your style. Next, you can start introducing pulsed TIG into your work and see the magic come to life.

Photo by @rl.works
The best way to experience a basic pulsed TIG if you don’t have a pulse-capable welder is to use a foot pedal to simulate it. Set your low and high amps for the pedal and perform a simple 1Hz (1 PPS) by pressing and releasing the pedal once per second. This is also a good way to start practicing pulse welding before getting a TIG machine that supports this feature.
Conclusion
It takes experience and trial and error to correctly set the pulse settings for every job. But, generally, high pulse frequency equals narrow, focused arc and deep penetration. Additionally, the lower the difference between high and low amperage of the pulse cycle, the higher the penetration and heat input. So, if you make a wide gap between the low and high amperage and reduce the time on the high amps, you’ll reduce heat input.

Photo by @foxdogwelding
Pulsed TIG is a fantastic feature that improves welding speed, penetration, and weld looks while minimizing heat input. If the pulse settings are correctly set, you’ll experience the best of both worlds — penetration with a lowered heat input.